

Monday, January 28, 2013
Ladybug Soapworks blog now available on Kindle!
I am so excited to announce that the Ladybug Soapworks blog is now available on the Kindle store for a monthly subscription cost of $0.99. This allows you to read my blog even when you are not connected to the internet. This is also a great way for you to take my recipes and tutorials with you into your kitchen or soap "lab" and have them easily accessible without printing them out and wasting paper. Want to sign up? Click here.

Sunday, January 27, 2013
Indian Samosa Casserole
If you know me, then you know I LOVE Indian food. If I could, I would eat it every night! So when I came across this recipe for a Samosa casserole, I just had to make it! The recipe below is based off of the one on the vegetarian times website (see it here). I have modified a few things in my recipe to suit my tastes, but you may prefer to use the original.
1. To make crust: Preheat oven to 375°F. Whisk together flours and salt in bowl. Stir in oil and then add 6 to 10 Tbsp cold water until dough holds together. Shape into ball, cover with damp towel, and set aside.
2. To make filling: Stir together mustard seeds, curry, ginger, cumin, and red pepper flakes in a small bowl and set aside.
3. Cook potatoes in boiling salted water for about 15 minutes, or until tender. Drain, return to pot, and mash, leaving small chunks.
4. Heat the oil in a skillet over medium heat. Add onion, carrot, and garlic, and sauté 5 minutes, or until carrot is tender. Move onion mixture to side of pan, and add mustard seed mixture in center. Toast for about 30 seconds.
5. Stir in frozen peas and broth. Fold onion mixture into potato mixture; stir in agave nectar or sugar and season with salt and pepper to taste.
6. Spread filling into a 9-inch pie pan and set aside.
7. Roll out crust dough to 11-inch circle on a lightly floured work surface. Cover filling with dough and crimp edges with fingers. Cut X in center to vent steam and lightly brush with milk just before baking.
8. Place pie on baking sheet to catch any potential bubbling over and bake 40 to 50 minutes, or until crust is golden. Let stand 5 minutes before serving.
9. I topped it with a tamarind-date sauce I bought from an Indian grocery store. Yum!
Let me know if you make this and how it turned out!
Indian Samosa Casserole Recipe
Crust
- ½ cup all-purpose flour
- ½ cup whole-wheat flour
- ¼ tsp. salt
- 2 Tbsp vegetable oil
- 2 Tbs. yellow mustard seeds
- 2 tsp. curry powder
- 2 tsp. ground ginger
- 1 tsp. ground cumin
- 1/4 tsp. red pepper flakes (optional)
- 5 medium potatoes, peeled and quartered (1 ¼ lb.)--I used closer to 2 lbs
- 1 ½ tsp. vegetable oil
- 1 large onion, diced (~1.5 cup)
- 1 large carrot, diced (~1 cup)
- 3 cloves garlic, minced (1 Tbs.)
- 1 cup frozen peas
- 1 cup low-sodium vegetable broth
- 2 tsp. agave nectar or sugar
- 2 Tbsp milk
 |
| Crust dough |
 |
| Seasonings |
 |
| Potatoes mashed |
 |
| Toasting seasoning |
5. Stir in frozen peas and broth. Fold onion mixture into potato mixture; stir in agave nectar or sugar and season with salt and pepper to taste.
 |
| Mixing the onions, carrots, and pea mixture into the mashed potatoes. |
 |
| Filling spread in pie pan |
 |
| Filling covered with crust dough. |
 |
| Cooked until the crust was golden brown |
 |
| Delicious! |
Saturday, January 26, 2013
Sweet treats for your Valentine
Looking for something great for that special person in your life? Ladybug Soapworks has an assortment of products that would make anyone happy. To find the items in the picture below, go here for the cupcake soaps, the bath melts here, the bath salts here, and the geranium rose soap can be purchased here. Order soon as Valentine's day is in only 20 days!
If you prefer, you can find all the same items listed at my etsy store here. Be sure to friend me on Twitter and get a 15% off discount for use on either site!

Friday, January 25, 2013
Soaps, Drugs, & Rock and Roll
I have to admit that this is really old news, but I am sure that most people have not heard this story and I wanted to share this great video. The video below explains how real soap tests positive (false-positive that is!) for the date rape drug. This is simply a problem with the drug testing kit, but it turns out to be a great way to find out if what you are using is indeed real soap and not a mixture of synthetic detergents. Their are many cases of products being mislabeled and claiming to be soap when they are in fact detergent. While this test is a pretty cool trick for us soapmakers, I am sure most people will not want to check their soap with a drug kit to determine if it is really soap. An easier way to determine what is in your product is to look at the labels. Be on the look out for "soaps" that have Sodium Laureth Sulfate, Sodium Lauryl Sulfate, Ammonium Lauryl Sulfate, Ammonium Laureth Sulfate, or Cocomidopropyl Betaine as these are all common detergents used in soap-like products. On the other hand, if the label lists oils and sodium hydroxide or potassium hydroxide as the ingredients, then you have real soap. I should note that real soap and detergent products can be found in both solid (bar) and liquid forms.
Check out the video below and at the very end you will see a list of companies that are falsely advertizing their product as soap. As a consumer, you should be able to make an educated choice about what products you are putting on your body.
Thursday, January 24, 2013
Geranium rose bath (oil) melts tutorial
Bath melts are a wonderful way to to add scent and skin nourishing oils to your bath. They are essentially bath oils made up in a solid form. All you have to do is drop 1 or 2 of them into a nice, warm bath and they will melt dispersing the oils and scent into the bath water. The melts pictured below are made from a combination of cocoa butter, shea butter, and sweet almond oil. The are scented with a Geranium Rose essential oil and topped off with some red and iridescent glitter, because sparkles make everything better!
 |
| Geranium Rose Bath Melts |
A simple recipe to make your own bath melts is given below.
- Melt 1 part cocoa butter and 1 part shea butter in the microwave.
- Add to the melted butters 1 part liquid oil.
- If needed, let the oils cool to below 120 degrees F and then add your fragrance (1-3% for fragrance oils and 1-2% for essential oils).
- Mix and pour into small molds (about 1 oz mold size is good)
- Allow to cool and harden either at room temperature or for a faster cooling place in your fridge until solid.
If all these "parts" are confusing, here is an example using oz.
1 oz cocoa butter
1 oz shea butter
1 oz liquid oil (sweet almond, hazelnut, hemp oil, or pretty much any other liquid oil would be fine).
17 (1%)-50 (3%) drops of fragrance
You may want to play with the ratio of hard oils (butters) to liquid oil to find what looks and feels best to you.
Wednesday, January 23, 2013
Tutorial: Calendula Salve
Calendula (Calendula officinalis) commonly known as pot marigold has antiseptic and anti-inflammatory properties. It has traditionally been used for treating sunburn, cuts, insect bites and stings, acne, soothing sore or inflamed muscles, diaper rashes, and other skin irritations.
Using one of the methods I explained in this previous blog post, prepare some Calendula flower infused oil. I prefer to use Olive oil for this recipe. You may also add Lavender essential oil to this salve to give it a soothing, sedative effect. Lavender is known to relax muscles, calm anxiety and promote sleep. It is also antiseptic and can be used on cleaned cuts and bruises to minimize scarring and relieve skin irritation. Lavender and Calendula really complement each other in a healing salve.
Calendula Flower
 |
| © Lessadar | Stock Free Images & Dreamstime Stock Photos |
Ingredients:
3.5 oz Calendula flower infused herbal oil
½ oz Beeswax (small pellets will be easiest to work with)
20 drops Lavender essential oil (optional)
½ oz Beeswax (small pellets will be easiest to work with)
20 drops Lavender essential oil (optional)
Directions:
Melt beeswax in the Calendula infused oil over a double boiler until melted. Beeswax melts at 144 to 147 °F (62 to 64 °C). Remove from the stove. Once the temperature has reached 120 °F, stir in the Lavender essential oil. Pour into clean (sterile preferred) tins or glass jars. Allow to cool thoroughly before using or placing caps on the jars. This salve should last 1-2 years if kept free of water.
Tuesday, January 22, 2013
Chocolate Coconut Sugar Scrub
I have been working on some sugar scrubs this week and I have made some that I think are unique. One of my favorites is the chocolate coconut sugar scrub. It is made from unrefined coconut oil (retains the lovely coconut scent), sweet almond oil, demerara sugar, and a bit of chocolate fragrance oil. This is such a yummy scent, it reminds me of a candy bar! I love that I was able to get half of the scent from the coconut oil. This helps to keep the product even more natural by eliminating some of the fragrance oil.
I first measured out the oil and sugar. The coconut oil was then gently melted in the microwave.
The sugar was added to the oils and mixed. Then the fragrance was added and mixed into the scrub.
I packaged the scrub into cute 8 oz containers. No preservative is needed in this scrub as it does not have any water in it. Since the scrub will be used in the shower, you may want to scoop a bit out with a clean spoon instead of your fingers to keep out the water and any germs on your hands.
Since this is not an emulsified scrub, it will leave your skin smooth and moisturized. Scrub made from oil may leave your tub a little slippery, so you need to be cautious when getting out of the tub.
 |
| Getting the ingredients out. |
 |
| Mixing the scrub |
 |
| In it's pretty little container |
 |
| It looks delicious! |
Monday, January 21, 2013
Tutorial: How to make infused oils.
Infusing botanicals into vegetable oil is a great way to transfer the properties of flowers, roots, seeds, or leaves into an oil. This oil can then be used directly on the skin as a medicinal oil or to make soap, lotions, salves, balms, or many other bath and body products. Some herbs are great for imparting a color to the oil which can be used to color soap, lotion, etc. There are two methods that are most commonly used to infuse or macerate herbs into vegetable oils. Both methods are quite simple and can be done with items common to most kitchens.
The first method: Traditional Cold Brewing
Step 1: Clean a glass jar with soap and hot water (I like to spray it with 70% ethanol to sanitize after washing). Allow jar to completely dry.
Step 2: Fill the jar with loosely packed dry herb. You can use many type of herbs and flowers such as calendula, jewelweed, chamomile, comfrey, arnica, etc.
Step 3: Pour in a liquid vegetable oil to cover the plant material. I like to use olive oil, but you can use sweet almond oil and many other types. You may want to choose your oil depending on what you plan to make with the infused oil. For a lip balm, sweet almond oil would probably be better than olive oil and for a massage oil you may prefer to infuse into fractionated coconut oil.
Step 4: Close the jar, shake, and place in a warm sunny window for at least 3 weeks but you could continue infusing for up to 6 weeks. During the first two weeks, try to shake the jar daily.
Step 5: Strain out the plant material using either a metal mesh strainer and/or a cheese cloth.
Step 6: Bottle the infused oil and store in a cool dark place. The oils should be good for at least 1 year.
The second method: Quick Hot Brewing
Step 1: Place dry plant material into a crock pot, bain-marie, or a double-boiler. I prefer to use a crock pot as I can set it up and just come back occasionally to check on it. If you are doing this on the stove, you should be sure to stay nearby for safety.
Step 2: Cover plant material with oil of your choice. For this method, since you are adding heat you can even infuse into oils that are solid at room temperature (such as shea butter, coconut oil, mango butter, etc).
Step 3: Heat oils and plant material at about 100-125 degrees Fahrenheit for 1-3 hours. You want to gently heat the oil and not boil it as that could destroy the properties of both the oil and plant material.
Step 4: Strain away plant material as explained above.
Step 5: Store infused oil in a clean jar in a cool, dark place and it should be good to use for about 1 year.
This picture shows some of the other infusions I have made. The Ayurvedic olive oil is an infusion of 4 Indian herbs, the jewelweed infusion was made from the leaves of the plant, and the reddish-pink oil is alkanet root-infused olive oil. I can't wait to try the last one in soap to see how the color comes out!
I look forward to hearing if you try either of these methods and how the oils turn out.
The first method: Traditional Cold Brewing
Step 1: Clean a glass jar with soap and hot water (I like to spray it with 70% ethanol to sanitize after washing). Allow jar to completely dry.
 |
| Cleaning and drying my jar. |
 |
| Jar filled with Calendula petals |
Step 3: Pour in a liquid vegetable oil to cover the plant material. I like to use olive oil, but you can use sweet almond oil and many other types. You may want to choose your oil depending on what you plan to make with the infused oil. For a lip balm, sweet almond oil would probably be better than olive oil and for a massage oil you may prefer to infuse into fractionated coconut oil.
 |
| Olive oil added to jar so that it is just above the plant material |
Step 4: Close the jar, shake, and place in a warm sunny window for at least 3 weeks but you could continue infusing for up to 6 weeks. During the first two weeks, try to shake the jar daily.
 |
| Soaking up the sun's rays! |
Step 5: Strain out the plant material using either a metal mesh strainer and/or a cheese cloth.
Step 6: Bottle the infused oil and store in a cool dark place. The oils should be good for at least 1 year.
The second method: Quick Hot Brewing
Step 1: Place dry plant material into a crock pot, bain-marie, or a double-boiler. I prefer to use a crock pot as I can set it up and just come back occasionally to check on it. If you are doing this on the stove, you should be sure to stay nearby for safety.
Step 2: Cover plant material with oil of your choice. For this method, since you are adding heat you can even infuse into oils that are solid at room temperature (such as shea butter, coconut oil, mango butter, etc).
Step 3: Heat oils and plant material at about 100-125 degrees Fahrenheit for 1-3 hours. You want to gently heat the oil and not boil it as that could destroy the properties of both the oil and plant material.
Step 4: Strain away plant material as explained above.
Step 5: Store infused oil in a clean jar in a cool, dark place and it should be good to use for about 1 year.
This picture shows some of the other infusions I have made. The Ayurvedic olive oil is an infusion of 4 Indian herbs, the jewelweed infusion was made from the leaves of the plant, and the reddish-pink oil is alkanet root-infused olive oil. I can't wait to try the last one in soap to see how the color comes out!
 |
| Other herbal infusions |
Saturday, January 19, 2013
New Curing Rack...Yippie!
I have been dreaming of getting a bakers rack for a long time to use as a curing rack for my soap. I was finally able to get one and it just works perfectly! I love how it has wheels and I can roll around the room if I need. It also has plenty of shelves, so I can fit a lot of soap in the rack.
 I found this rack at www.webstaurantstore.com you can find the rack I got here. I would highly recommend that store as they have very good prices and quick shipping. I also bought a stainless steel cart with 2 shelve and they have stainless steel work benches for a very good price as well. Those are the next items on my wish list!

Friday, January 18, 2013
Adding Social Media Icons to your Blog
As you have probably noticed, I am making a lot of upgrades to both my blog and online store. My newest additions are the pretty social media icons you can see to the right. Adding these icons to my blog took a lot of trial and error, looking at the source code for other sites and trying to figure out how to modify it for my site. Well in the end Dylan helped me and I FINALLY got it to work. Since I found this process so difficult, I thought others might be going through the same struggles as me and perhaps I could save them some time and hassle. These directions are only for Blogger (Blogspot) blogs. So here we go:
Step 1:
Find some social media icons that you like. A simple Google image search for "social media icon png" will bring up a ton of options. Download the ones you decide to use. For my site, I am using a set called "Minimalist" that was designed by Zee Que at designbolts.com. You can get them here for free.
 Step 2:
If you have your own website upload your images to your Public_HTML folder. This will allow you to access the icon at www.YOUR_WEBSITE.com/IMAGE_NAME.png. Obviously, you need to change YOUR_WEBSITE to the name of your site and IMAGE_NAME to the name of the image (likely something like Twitter.png or Pinterest.png).
If you do not have your own site to upload the images you can upload them to a place like Flickr where you can get a link the the specific icon image.
Step 3:
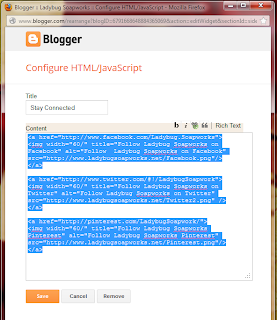
Go to your blog and select the layout tab. Then click on the 'Add a Gadget' in the area of the blog that you would like to place your icons. In the popup, select the "HTML/JavaScript add third-party functionality or other code to your blog" gadget.
Step 4:
Give this gadget a title if desired. Then you will have to type in a modification of the code given below. You will need to add the text highlighted in gray between <a and </a> into the content box. The first example is for Facebook. In the text below, where it says YOUR_USERNAME you will need to change to text to reflect your Facebook name. You will also have to change/modify the link to access your icon image; replacing YOUR_WEBSITE with the name of the site where the image is stored and ICON_NAME to the exact name of the icon.
<a href="http://www.facebook.com/YOUR_USERNAME">
<img width="60/" title="Follow YOUR_USERNAME on Facebook" alt="Follow YOUR_USERNAME on Facebook" src="http://www.YOUR_WEBSITE.com/ICON_NAME.png"/>
</a>
Here are the examples for Twitter and Pinterest for my site. Now following the directions above, just change where I have Ladybug Soapworks and my website and image name to the appropriate names for your site.
<a href="http://www.twitter.com/#!/LadybugSoapwork">
<img width="60/" title="Follow Ladybug Soapworks on Twitter" alt="Follow Ladybug Soapworks on Twitter" src="http://www.ladybugsoapworks.net/Twitter2.png" />
</a>
<a href="http://pinterest.com/LadybugSoapwork/">
<img width="60/" title="Follow Ladybug Soapworks Pinterest" alt="Follow Ladybug Soapworks Pinterest" src="http://www.ladybugsoapworks.net/Pinterest.png"/>
</a>
Step 1:
Find some social media icons that you like. A simple Google image search for "social media icon png" will bring up a ton of options. Download the ones you decide to use. For my site, I am using a set called "Minimalist" that was designed by Zee Que at designbolts.com. You can get them here for free.

If you have your own website upload your images to your Public_HTML folder. This will allow you to access the icon at www.YOUR_WEBSITE.com/IMAGE_NAME.png. Obviously, you need to change YOUR_WEBSITE to the name of your site and IMAGE_NAME to the name of the image (likely something like Twitter.png or Pinterest.png).
If you do not have your own site to upload the images you can upload them to a place like Flickr where you can get a link the the specific icon image.
Step 3:
Go to your blog and select the layout tab. Then click on the 'Add a Gadget' in the area of the blog that you would like to place your icons. In the popup, select the "HTML/JavaScript add third-party functionality or other code to your blog" gadget.
Step 4:
Give this gadget a title if desired. Then you will have to type in a modification of the code given below. You will need to add the text highlighted in gray between <a and </a> into the content box. The first example is for Facebook. In the text below, where it says YOUR_USERNAME you will need to change to text to reflect your Facebook name. You will also have to change/modify the link to access your icon image; replacing YOUR_WEBSITE with the name of the site where the image is stored and ICON_NAME to the exact name of the icon.
<a href="http://www.facebook.com/YOUR_USERNAME">
<img width="60/" title="Follow YOUR_USERNAME on Facebook" alt="Follow YOUR_USERNAME on Facebook" src="http://www.YOUR_WEBSITE.com/ICON_NAME.png"/>
</a>
Here are the examples for Twitter and Pinterest for my site. Now following the directions above, just change where I have Ladybug Soapworks and my website and image name to the appropriate names for your site.
<a href="http://www.twitter.com/#!/LadybugSoapwork">
<img width="60/" title="Follow Ladybug Soapworks on Twitter" alt="Follow Ladybug Soapworks on Twitter" src="http://www.ladybugsoapworks.net/Twitter2.png" />
</a>
<a href="http://pinterest.com/LadybugSoapwork/">
<img width="60/" title="Follow Ladybug Soapworks Pinterest" alt="Follow Ladybug Soapworks Pinterest" src="http://www.ladybugsoapworks.net/Pinterest.png"/>
</a>
I hope this tutorial will help you to get your blog looking a little more professional, too!
Subscribe to:
Posts (Atom)